Calibrating Technika Lens Cams, part 2
Index
The function of the cam
- The cam translates bed to rangefinder
- Each cam has the same infinity point
- Arm rests at 90 degrees
- Engaging the cam
The calibration sequence
Marking the cam
Filing the cam
Introduction
This is part 2 of a 2 part guide on how to calibrate a focusing cam for a lens on a Linhof Technika in order to get accurate rangefinder focusing. The images show a 4×5 Technika IV, but the method applies equally to other models including 6×9 and 5×7 cameras. Blank (uncalibrated) cams can be ordered from my Shapeways shop. Used cams found on ebay may also be used with certain limitations. Part 1 of this guide is a check list to ensure that your camera functions optimally. If you feel confident that your camera is in good shape you can collect the tools and prepare your work space.
Following is the procedure for calibrating the cam for your lens. Beware that this method is laborious, and will require a good deal of patience, but if you work diligently it is possible to achieve a high degree of accuracy. Lets’ get started!
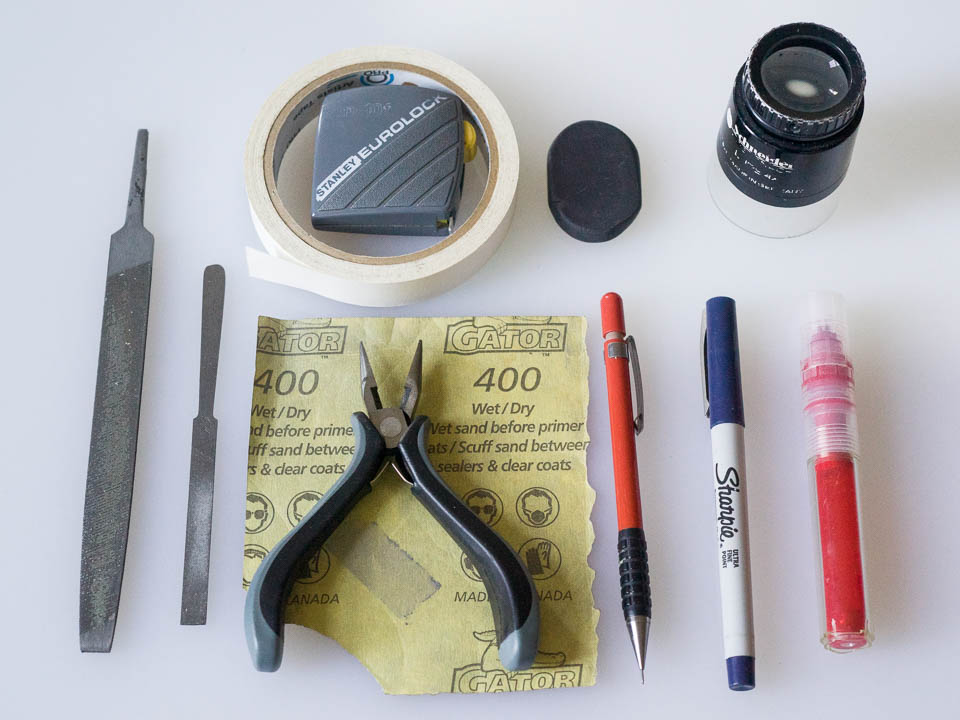
Tool list
Marking:
- a soft pencil
- a white board marker
- eraser, or tissue for wiping marks.
Removal:
- flat metal files of various size and roughness.
- fine grit sand paper (400+).
General:
- a good loupe
- pliers
- masking or artist tape
- tape measure
Location:
You will want to work somewhere that has a good view to infinity. For shorter lenses 100m /300ft may be sufficient, but the farther your infinity is, the better. Check on the ground glass to see if you can distinguish between distant points. If you can, pick a more distant object. You will want to be able to set up a tripod and easily pan past nearer subjects. 4 or 5 points that are evenly spaced from infinity to 1m /3ft will do. For example a sequence like: infinity, 15m (45ft), 7m (20ft), 4m (12ft), 2m (6ft), 1m (3ft.) These distances are approximate, as you will always be comparing the rangefinder to the ground glass. You also want enough room to work comfortably, with lenses, and tools.
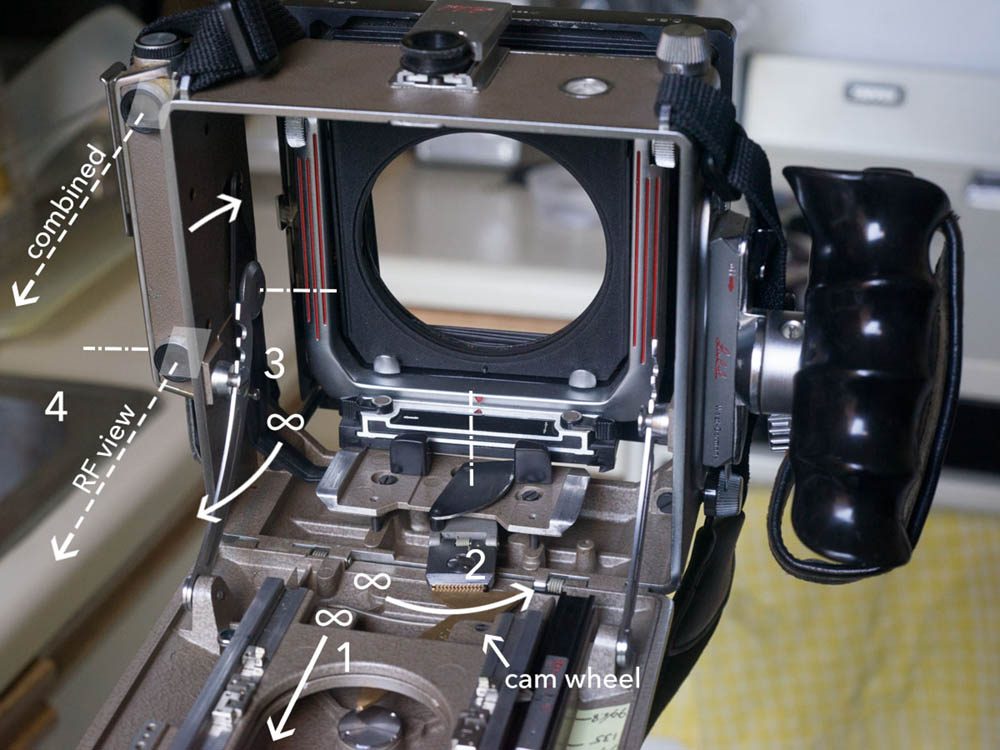
The function of the cam
In Part 1 I have described the working of the rangefinder system on a Linhof Technika. Next I’ll describe in more detail what the roll of the cam is. I’m including this diagram again as a reference.
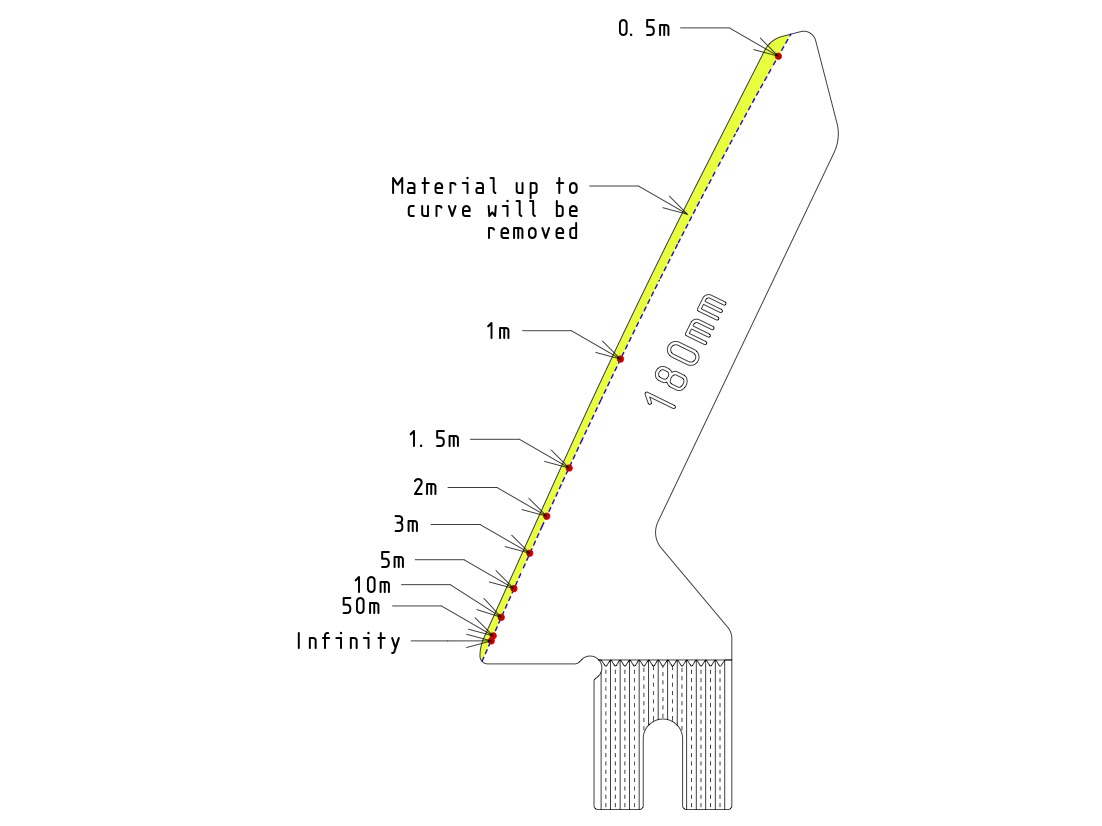
The cam translates the bed to the rangefinder
Lenses of different focal length need to travel varying distances forward from infinity to achieve focus on any particular subject. Longer focal length lenses need to move farther than short focal length lenses. Any given angle of the swinging arm holding the cam corresponds to a particular focus distance. The bed position that holds a lens in focus at that focus distance will vary depending on the lens. The cam is the means to translate the bed movement to the cam arm for one particular lens. The blade of the cam on which the cam wheel slides (it doesn’t roll) needs to have a calibrated curve in order to ensure any bed position for the lens corresponds to the same focus distance in the rangefinder.
Each cam has the same infinity point
Although each lens and cam is unique it is important to understand that all cams belonging to one camera should hold the cam arm at infinity in exactly the same place. Because of this you should always start your calibration effort at infinity.
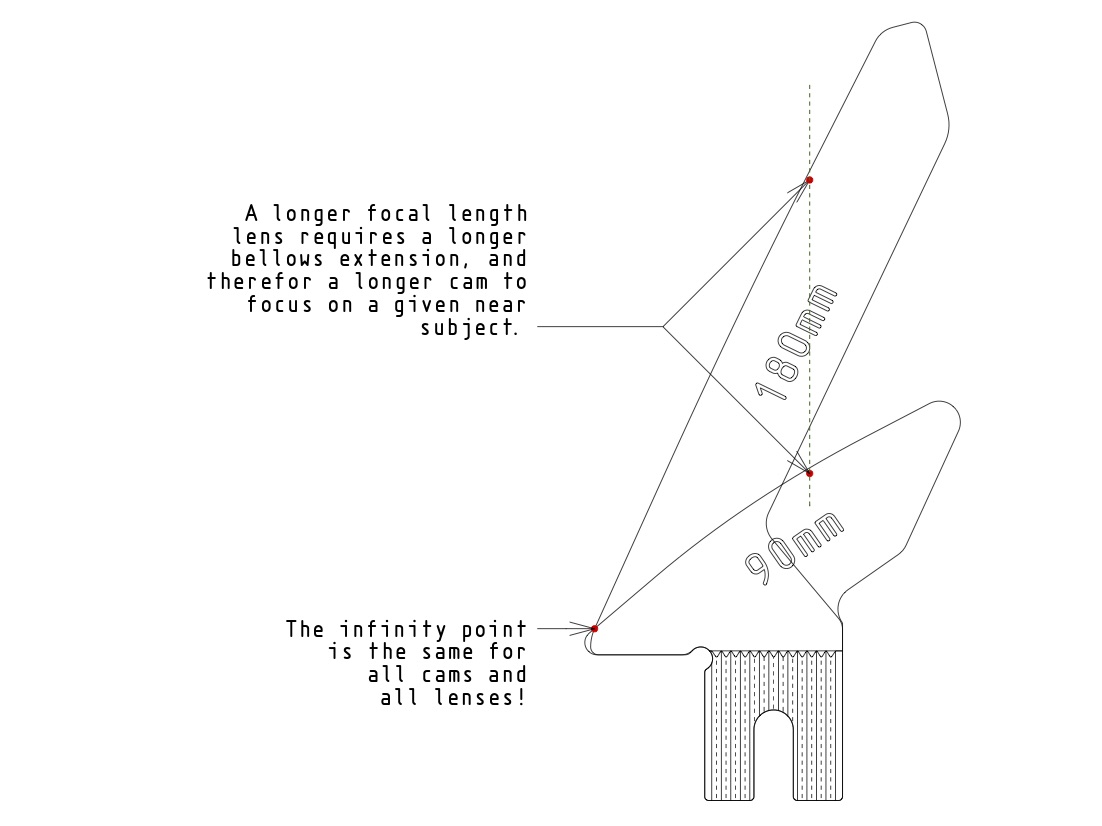
Arm rests at 90 degrees
The rangefinder image will be aligning at infinity when the cam arm is at about 90 degrees. This is also where the cam arm should be when you fold up the body to ensure the cam does not get jammed. A calibrated cam of any focal length should hold the arm in this position when the bed is rolled fully back. A cam that is not yet calibrated will have extra material at the infinity point, and so the cam wheel will push the arm farther out than needed. The rangefinder images will align at infinity while the bed is not yet fully back. If you roll it further, it will go past infinity. When calibrating, we will file enough material from the cam so the rangefinder aligns at infinity exactly as the bed hits its back stop.
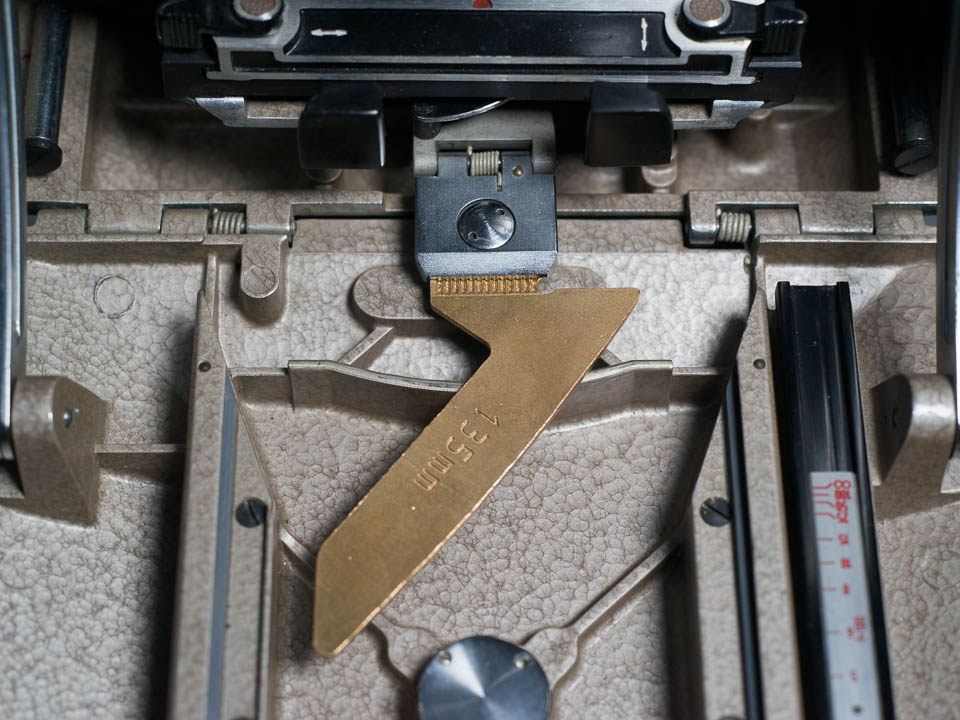
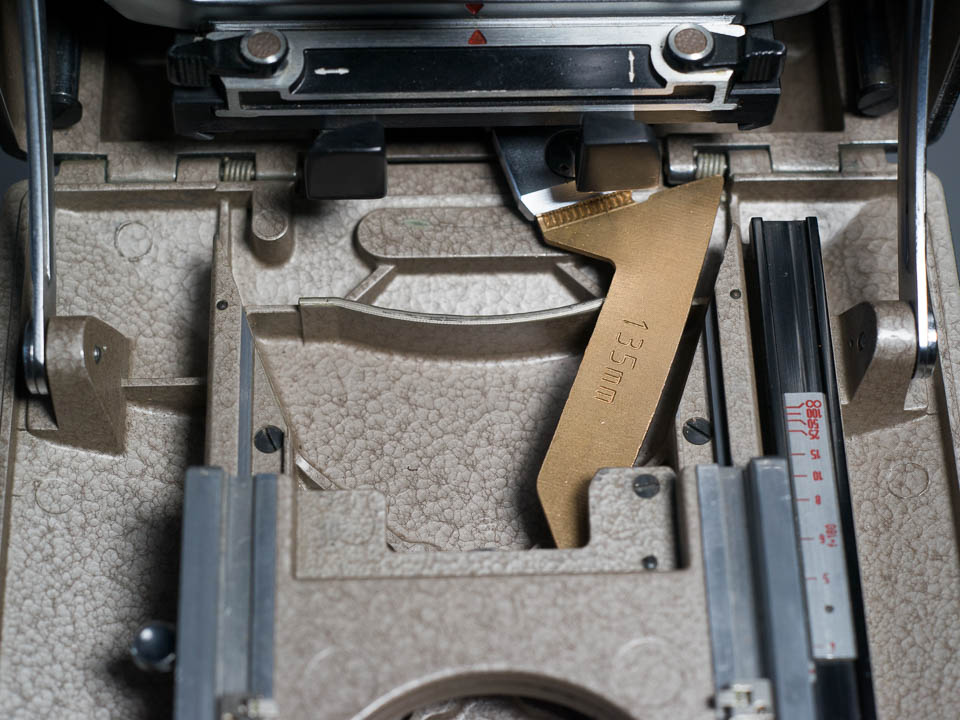
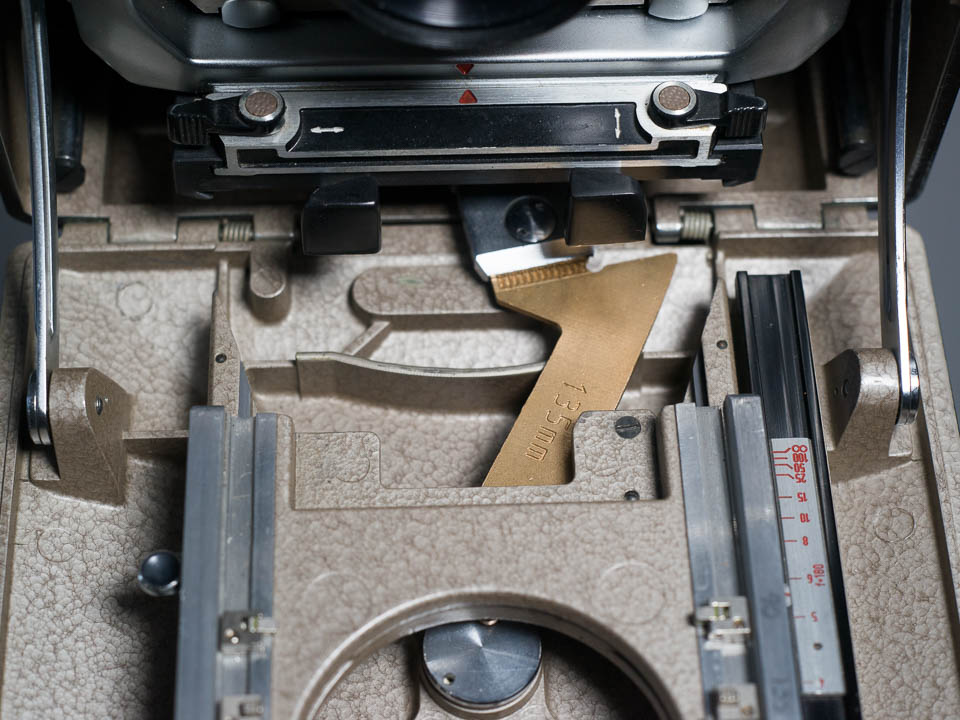
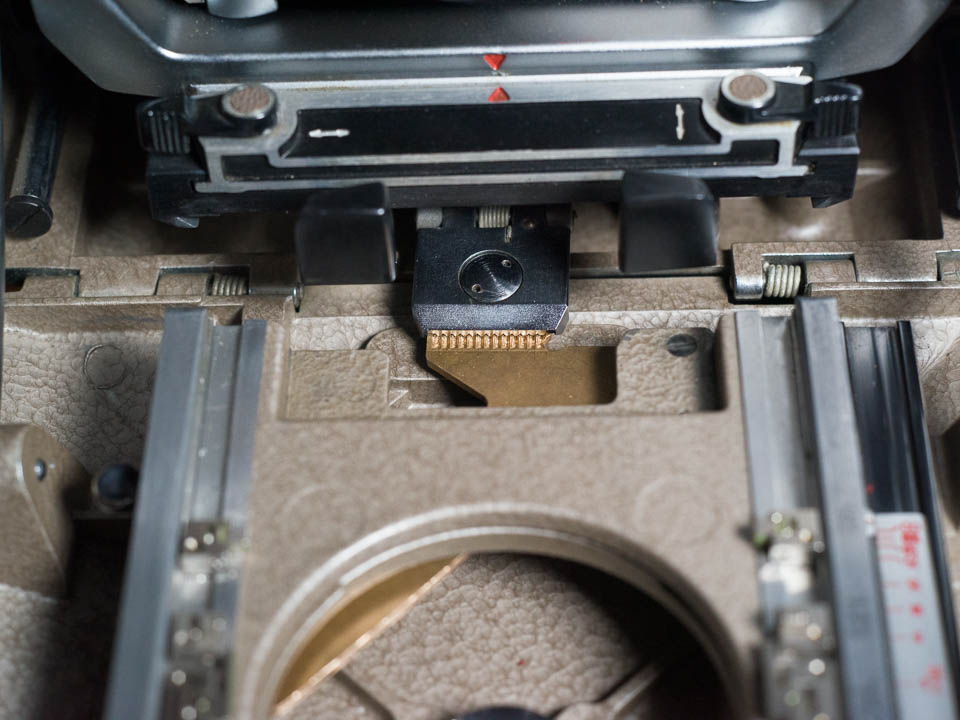
Engaging the cam
Pull the lens stand forward from its body rail enough to disengage the cam arm. Observe how rolling the bed toward the body engages the tip of the cam and how that changes the angle of the cam arm, and thus the rangefinder. Calibrating the cam will ensure that the relationship between the bed position and cam arm are accurate over the full distance of travel, while the cam is being engaged.
The calibration sequence
Outline of the sequence
I recommend reading through this whole section before starting. You will work in sequence from infinity to close focus past each of the subjects you have chosen to focus on. After the first one or two rounds of filing you will get infinity focus moderately close to where you want it and then go to the next nearer subject until you are in the ball park across the range. You will go back over the range from infinity again in multiple passes to get each position closer to accurate focus. Remember that material filed away can’t be replaced. When one area of the cam looks like it is very close, stop and concentrate on other areas that are less close. In the end switch to increasingly fine abrasives so you have a nice smooth edge. Ideally you will be evenly off across the range so a last pass with fine sandpaper will be all that is needed. When you are close everywhere you need to work carefully not to overshoot in your enthusiasm to finish. Removing too much material will result in focusing behind your subject. Erring on the side of front focus is preferable as you can always improve it later. Metal removed can not be put back.
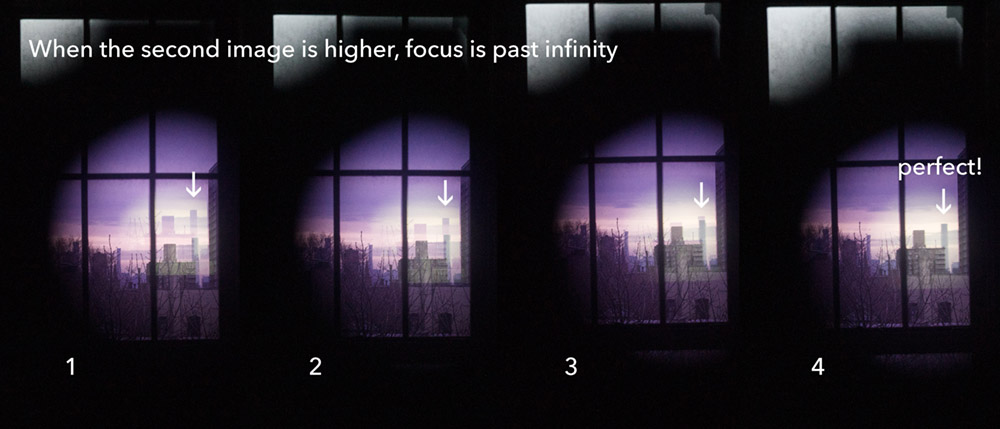
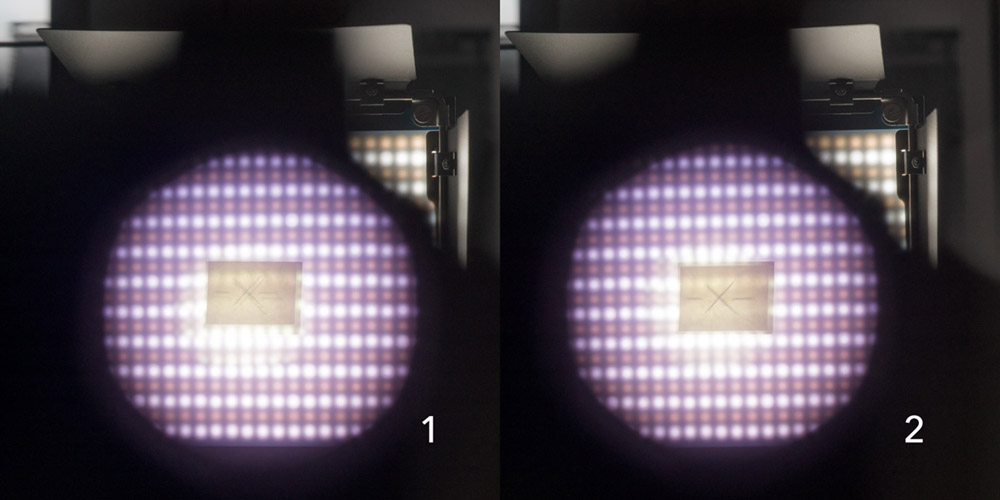
Higher second image = remove more metal
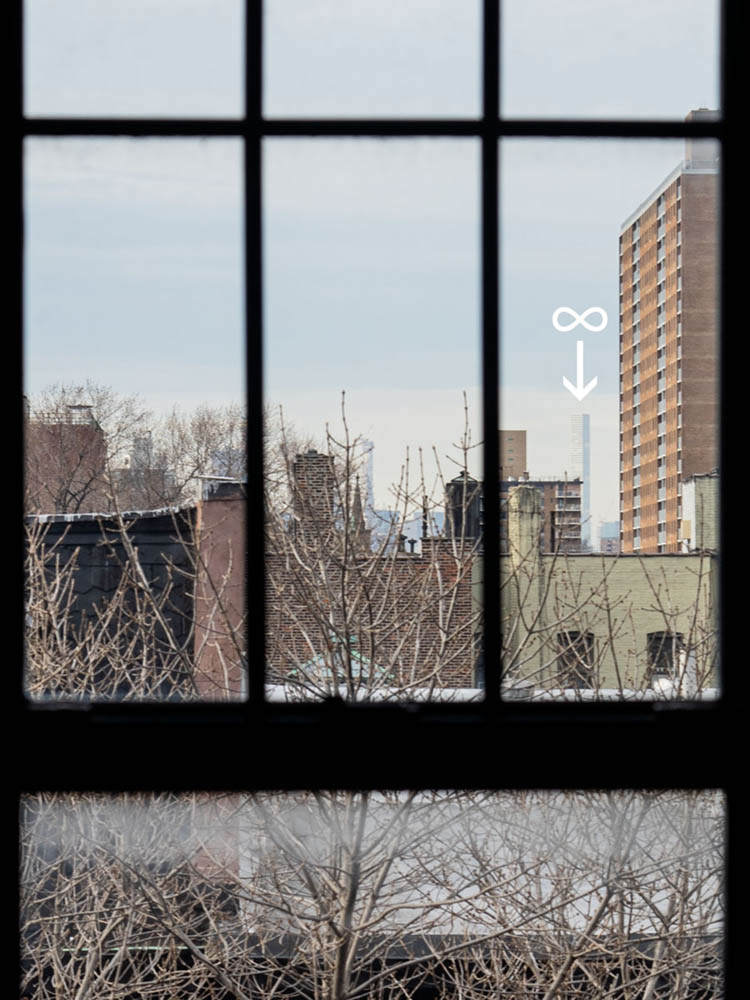
Set up the camera with the new cam and center the rangefinder on your infinity object. Roll the bed far forward, and then slowly back until the images align at infinity. Now roll it back until it hits its stop. Observe how the second image first was below and then shot up past its target. As long as the second image is higher than the subject while the subject is in focus on the ground glass, you still have more material to remove. Memorize this or make a note to avoid confusion.
As you are removing material, you will want to keep returning to verify the progress. You’ll notice the two images inching closer together until they are eventually fully aligned.
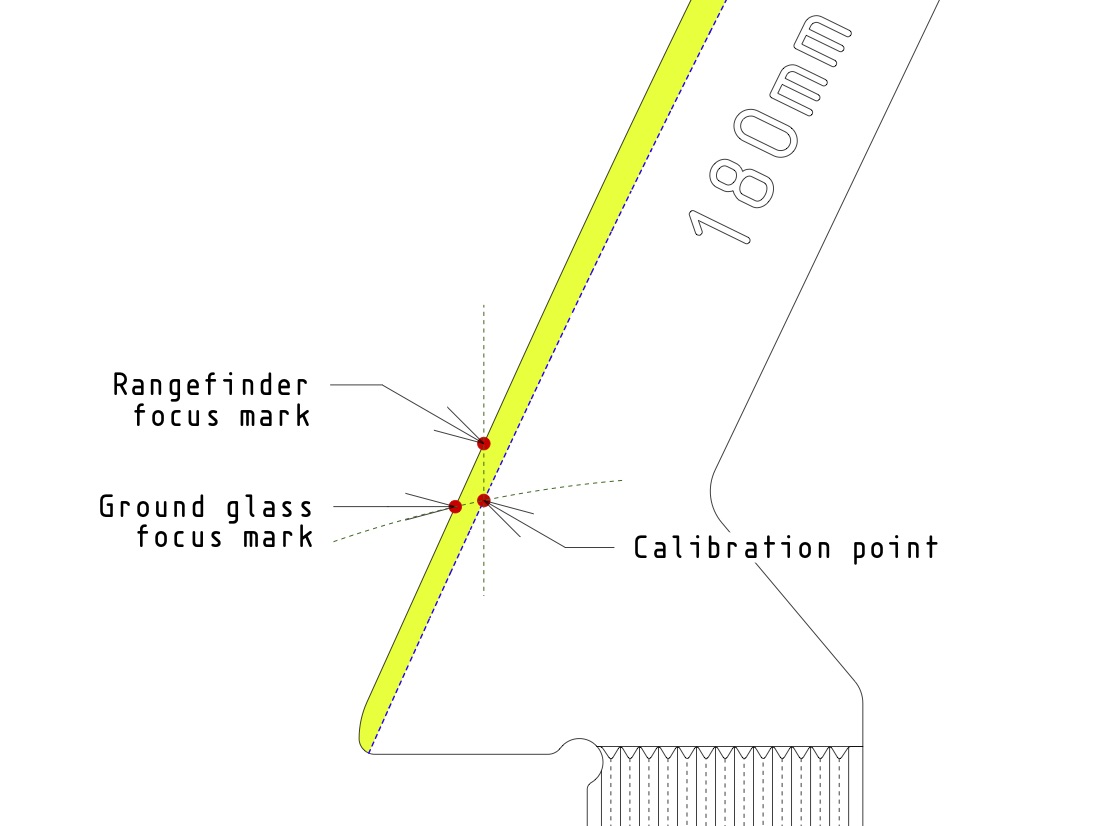
Estimating the calibration point
At each subject distance you will be making two marks, one indicating where the rangefinder images are aligning, and one mark where your subject is sharp on the ground glass. Like with the double image in the rangefinder these marks will progressively move closer together each time you check, until finally they merge. Having these marks it is possible to establish the point on the curve with geometry, but since our marking will not be that accurate, it is enough to know that your calibration point will be somewhere in between.
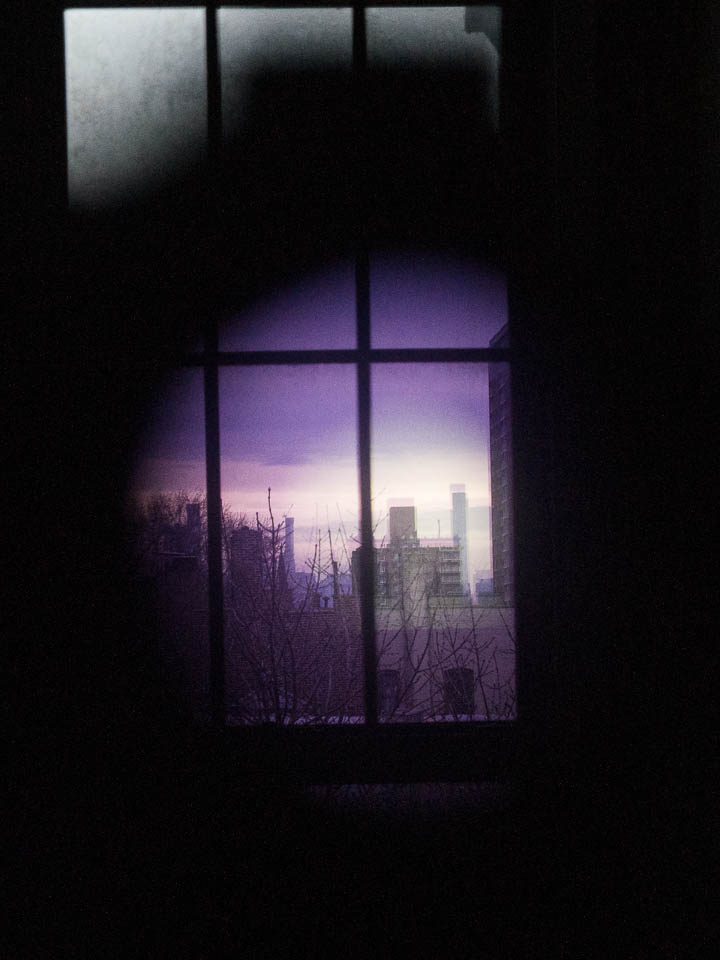
For the closer subject distances picking something bright like a light helps to see it clearly in the rangefinder as well as the ground glass. Ideally it can be easily moved and positioned at different distances. Making a clear horizontal mark is best since the rangefinder moves vertically.
Marking the cam
The first marking pass
The markings you need to make on the cam are to indicate where the cam wheel touches the cam. Getting access to the cam while the lens is mounted and the bed is obscuring it will be difficult. The trick is to use a whiteboard marker and mark the edge of the cam blade. When the wheel touches the cam the marker will be wiped away. We can then add pencil lines to record the information.
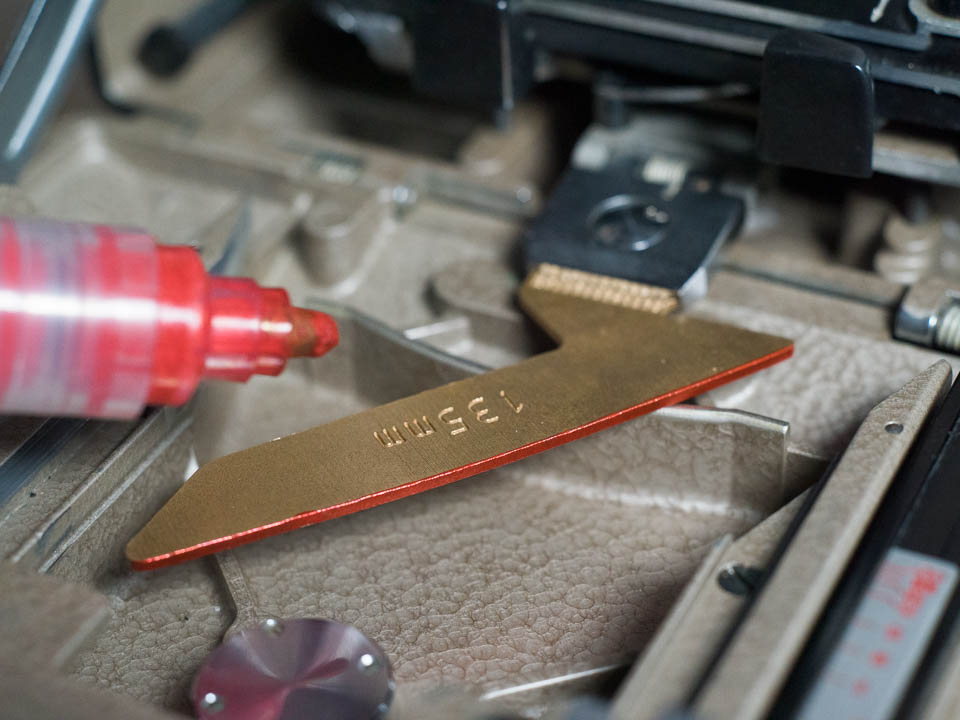
With the bed forward for access whiteboard mark the cam. With your finger hold the cam out of the way while you roll the bed all the way back to its stop. Now drop the cam onto the wheel. It is marking ‘real infinity’, where the lens is drawing infinity sharp on the ground glass and the film. Look through the rangefinder, and slowly roll the bed forward until the two images coincide. With your finger hold back the cam again while you move the bed forward to get access and see the result. Put a pencil mark at both ends of the strip where the wheel touched the cam. This will be the first area to file metal away.

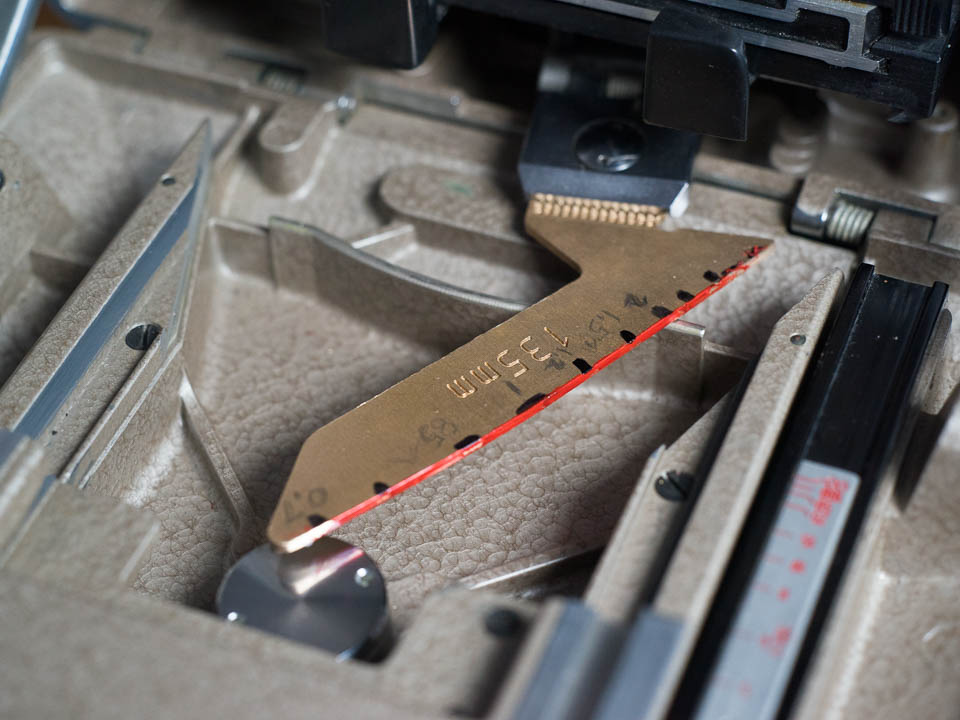
On the first pass repeat the marking sequence for every subject distance. This gives you an indication if you will need to remove more metal in certain areas than others. High and low marks spaced further apart indicates more filing in that area.
To avoid accidentally running the wheel up and down the cam and wiping all the whiteboard marker, start again as above with the bed all the way back. Mount the lens at its stops, and hold the cam back, while focusing the lens on the glass. The focus does not need to be perfectly accurate, just close. If you feel like you need a third hand to hold a loupe, hook a rubber band around the cam to hold it back. Once in focus, drop the cam on the wheel and move to the rangefinder as before. Hold the cam again while rolling the bed back. Sit the lens standard in the body to get access to the cam to make your pencil marks. You will want to get comfortable with this sequence because you will be repeating it many times!

Second marking pass
After the first pass of marking, you can begin to file metal along the whole length of the cam concentrating most effort on the area near infinity. Periodically you can wipe all remaining marks, and redo marks for a couple of subject distances to get an idea of how much progress you have made. Repeat this process and whenever you are close at one calibration point, move on the the next nearer subject distance.
Marks while refining
In the beginning the marks are far apart, and progressively they inch closer together. Eventually the difference is too small to accurately mark. Now the marks mainly show where a particular focus distance is on the cam. At this stage you can find some arbitrary subjects at varying distances between the previously used subjects. Make a heavier mark at those points that need most work. After more filing in those areas, wipe the marks, and only make new marks where you need to file more than average. The objective is to move the whole curve closer and closer to where it needs to be, evenly. Finally the result should either be close enough or perfect. Remember that if you stop just short of where you want to be, you can return later to make things perfect. If you overshoot, you can’t go back.
Filing the cam
Filing tips
With your first pass of marks, remove the cam from the camera. Wipe the whiteboard marks, but leave the pencil marks. You will likely need to remove metal along the entire length of the curve to start with. As mentioned before, concentrate on the base of the cam near infinity.
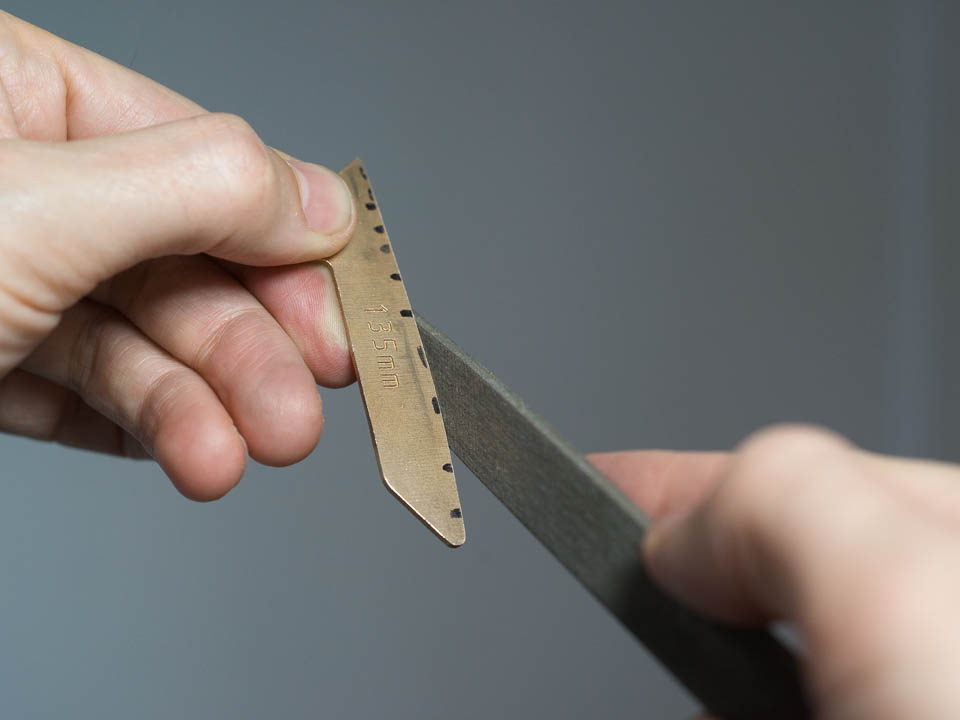
A large flat file is ideal to make an even gradual curve. Hold the file so you are making a nice square edge. Mostly you will use this one file. You can move to a smaller file if you want to remove material in a small area without affecting surrounding areas. This will be at the stage that you are refining your curve, trying to reduce any area that is not keeping up with the rest. Eventually a fine grit sandpaper can be used to take the whole curve back evenly and to end up with a smooth finish. Hold back from ‘perfect’ in any one area until you are ready to use the sand paper. Even the fine grit will remove more metal than you expect, so go slow. It is really satisfying when you can do a fine last pass, because the smooth edge will look and feel great.
Clean the cam with isopropyl alcohol to clear all the residual marks, ready to pop into your camera. Now it is time to load some film holders!